Provisioning and deploying ACR to secure docker image, deploy AKS cluster to host image – Part 2
Before you start with Part 2, I’m assuming that you have completed my previous blog article steps i.e. Setting up local environment for Docker, and create a Docker image locally) – Part 1 for setting up environment to deploy AKS cluster. If not please complete that and you can continue progressing further.
In this part of article we are going to understand about how provision and deploy docker image, push that image to Azure Container Registry and secure the image and post that deploy AKS (Azure Kubernetes Services) cluster.
To progress further, we can follow below tasks and complete the deployment.
Provision Azure Container Registry and upload image
Task 1: Provision ACR
- Open Command prompt and login into your Azure account using the following command (considering that you have install Azure CLI prior to this or followed part 1 of this series for machine set up)
az loginIn case you have access to multiple Azure subscriptions, then run the following command to set the default subscription.
az account set –subscription <subscription id>- Once logged in, run the following command to create an Azure Container Registry. Make sure that the name of the container registry is unique.
az acr create --resource-group aksdemorgp --name aksdemoacr --sku BasicYou can provision ACR using Azure Portal or PowerShell.
Task 2: Tag image
- Get the login server name of your container registry by running the following command. Replace your resource group name in below command and run.
az acr list --resource-group aksdemorgp --query "[].{acrLoginServer:loginServer}"
--output table
Above command will help you to get ACR details and further we can Tag our image under ACR. The output will be : aksdemoacr.azurecr.io
- To tag your docker image and to able to push it to Azure Container Registry. It should be in the format of acrloginservername/imagename. Run the following command to tag the image.
docker tag empapp aksdemoacr.azurecr.io/empapp- Verify that your image got tagged by running the following command
docker imagesCommand will return list of images listed in ACR with tag name.
Task 3: Push the Image
Once you are done with tagging your image, the next step is to push the image to ACR. To do that follow the below steps:
- Once the image is tagged, use the following command to login into your Azure Container registry
az acr login --name <acrName>- Once logged in, run the following command to push the image to container registry
docker push aksdemoacr.azurecr.io/empapp- Once the image get pushed, verify it by executing the following command:
az acr repository list --name <acrName> --output tableProvision Azure Kubernetes Service and deploy application
Now the next task is to provision AKS cluster and deploy application from ACR to AKS
Task 1: Provision Azure Kubernetes Service cluster using Azure CLI
- Continue in command prompt and run the following command to provision Azure Kubernetes Service. Replace with your resource group name and cluster name.
az aks create --resource-group aksdemorgp --name myAKSCluster --node-count 1
--generate-ssh-keys
You can change cluster node count as per your requirement, in this article I’m using node count to 1 to save cost while testing the environment. In you command prompt you will see that cluster will gets created and return with details.
- Once AKS cluster gets created, execute the following command to connect with AKS cluster
az aks get-credentials --resource-group aksdemorgp --name myAKSCluster- Verify that you are connected to the AKS cluster using the following command:
kubectl get nodesTask 2: Add ACR Credentials
- Azure Container Registry is a private registry and for AKS cluster to deploy application using the image stored in ACR, you must provide credentials and permissions.
- To do that, get the ID of the service principal configured for AKS. Update the resource group name and AKS cluster name to match your environment.
az aks show --resource-group aksdemorgp --name myAKSCluster --query
"servicePrincipalProfile.clientId" --output tsv
- Create the role assignment, which grants the proper access. Replace <ClientID> and <acrID> with the values gathered in the last two steps.
az role assignment create --assignee <clientID> --role Reader --scope <acrID>Above command will assign permission and access to perform AKS deployment further.
Task 3: Deploy application on AKS Cluster
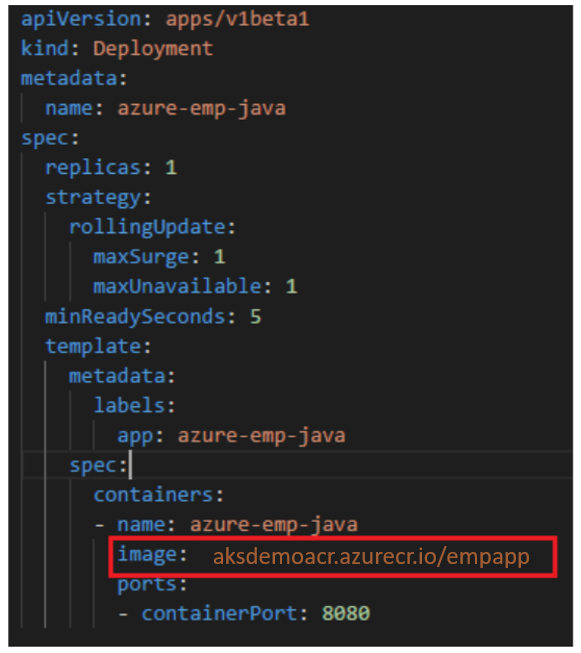
Now everything is setup and you are ready to deploy application to AKS cluster. But before deploying application, make sure you update the manifest file. To do that Open the azure-emp-java.yaml file inside the local application folder.

- Once the manifest is updated run the following command to deploy the application to AKS
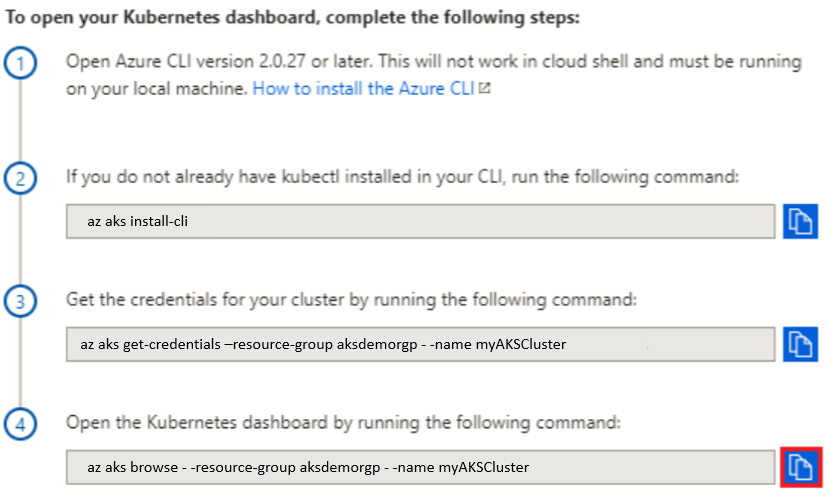
kubectl apply -f azure-emp-java.yaml- After deployment AKS service gets created, open Azure Portal and navigate to your AKS cluster. Click on View Kubernetes dashboard.

- You will see multiple commands listed in panel which helps you to perform certain tasks on AKS. Copy and execute the 4 th command in command prompt.

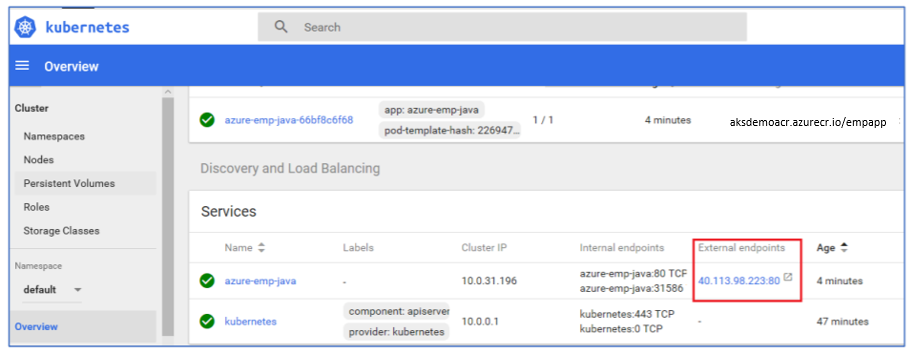
az aks browse - -resource-group aksdemorgp - -name myAKSClusterDashboard will be opened in the browser and if you scroll down to Services, you will find the external endpoint for the azure-emp-java application that you have just deployed. Copy the endpointIP/empapp to browse the application

That’s the last step of application to deploy and view it on AKS cluster.
To conclude with this, so far we have created Azure Container Registry to push docker image from local to ACR. After pushing image to ACR, granting access permission to fetch image from ACR to AKS cluster. We have provisioned AKS cluster with desired node to host application, and finally viewed the application from the AKS cluster dashboard.
To complete the series, stay tune and provide your feedback on how you liked overall Simplifying Container Orchestration with Azure Kubernetes Service (AKS) blog article.

