Setting up local environment for Docker, and create a Docker image locally) – Part 1
Containerization has been adopted by many organizations and it’s a way moving towards the adoption of application deployment in cloud environment. It’s not just developing and running applications in containers, it means that you need to have an complete life-cycle of application deployment at organization level and you should be capable of delivering applications through Continuous Integration, Testing, Continuous Deployment to containers.
To deploy apps, Docker container is way to package, automate and deploy apps as portable container. Once the application packaged into Docker image, there are certain challenges associated to manage them either in private/public cloud environment.
Basically, you need to address common scenarios like communication between containers, storage, security, cross platform deployment and many more similar kind of issues. There are multiple ways to handle these scenarios, for example multiple orchestrator services providers available to manage containers effectively.
Kubernets is one of them and an open source container orchestration tool, which allows developers to manage containers with rich feature set. It’s flexible enough to address all the container management problems. There are two flavors of orchestration, self-managed or managed Kubernets cluster. In this article, as per my title I’m planning to focus on Azure Kubernets Services to deploy as managed cluster in Azure.
Overall AKS deployment, I’m planning to cover in different series of blog as listed below:
- Setting up local environment for Docker, and create a Docker image locally) – Part 1
- Provisioning and deploying ACR to secure docker image, deploy AKS cluster to host image – Part 2
- Updating application, scaling AKS cluster – Part 3
- Integrating CI/CD and automating image deployment on AKS – Part 4
- Blue/Green deployment of AKS cluster using ARM Template – Part 5
To perform this activities, assuming that you have valid Azure subscription. If not you can also try Free Trial to provision and create resources to deploy AKS cluster. Also assuming you have quite good hands-on experience in working with Azure services like Virtual Machines, VNET, Storage and other PaaS services.
Let’s get started, to start with you need to create and test creating docker image locally.
Setup Local Environment
Task 1: Install Docker
- Install Docker Community Edition using this link: https://www.docker.com/communityedition
- Make sure you need enable Hyper-V to run docker on your local machine. You can also follow this link to enable Hyper-V
- Once installed, open cmd prompt and run the following command to verify the installation
docker versionTask 2: Install Maven
- In this demo we are planning to work with Java based application, so keeping in mind future steps of CI/CD integration and other steps, configure Maven to build the java application. TO install Maven using this link: https://maven.apache.org/download.cgi
- Once downloaded, unzip the folder and set the environment path by pressing Windows Logo key + R and enter sysdm.cpl
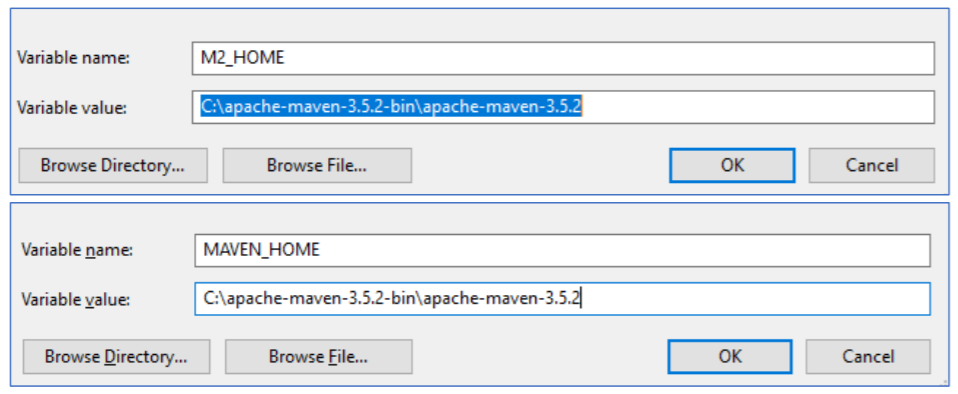
- Go to Advanced tab and click on Environment Variables. Under System Variables, click on New and give Variable name as MAVEN_HOME and for variable value give the path to the unzipped folder. Again, click on New and give Variable name as M2_HOME and for variable value give the path to the unzipped folder

- Once you are done with installation, open command prompt and run the following command to verify the installation of Maven:
mvn –versionTask 3: Install Chocolatey
To install Kubectl, Chocolatey needs to be installed. Open command prompt and run the following command (use this link for reference: https://chocolatey.org/install):
@”%SystemRoot%\System32\WindowsPowerShell\v1.0\powershell.exe” -NoProfile -InputFormat None -ExecutionPolicy Bypass -Command “iex ((New-Object System.Net.WebClient).DownloadString(‘https://chocolatey.org/install.ps1’))” && SET “PATH=%PATH%;%ALLUSERSPROFILE%\chocolatey\bin”
Task 4: Install Kubectl
Once Chocolatey is installed, run this command to install kubectl:
choco install kubernetes-cliTask 5: Install Azure CLI
Azure CLI is used to provision Azure resources and manage them. To install Azure CLI, click on this link: https://docs.microsoft.com/en-in/cli/azure/install-azure-cli
Download Sample Application and run locally
Task 1: Provision Storage Account
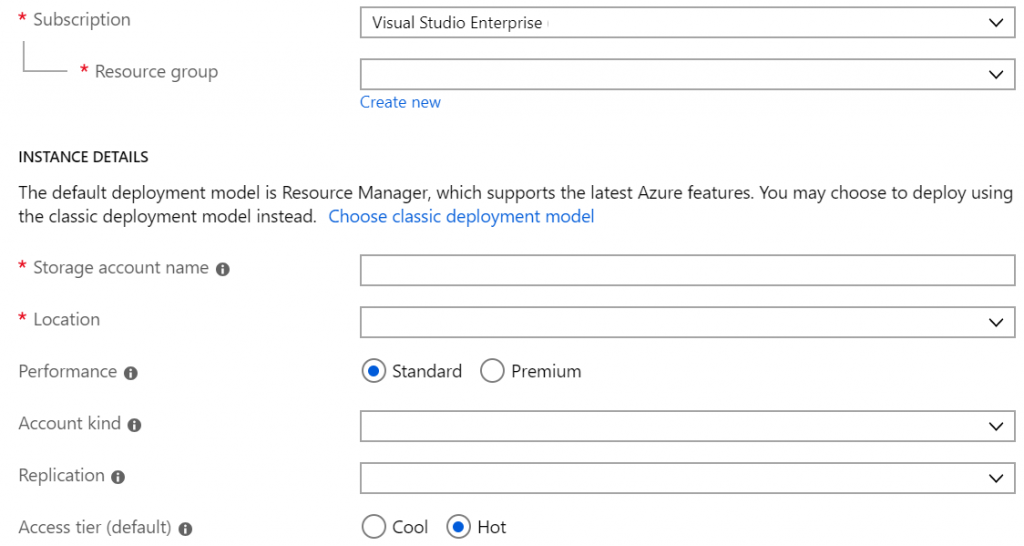
Go Azure Portal (portal.azure.com) and login into it. Click on + Create a Resource -> Storage -> Storage Account.
Fill in the following details:

- Subscription: Choose respective subscription under which you are provisioning services
- Resource Group: Create a new resource group and give it a name
- Storage Account Name: Give a unique name for the storage account
- Account kind: Storage (General purpose)
- Replication: Locally-redundant (LRS) just to save cost for this demo purpose
- Performance: Standard
- Secure Transfer required: Disabled – for best practices I recommend this feature to be enabled
- Virtual Networks: Disabled
- Click on Review + create, button at the bottom of the screen
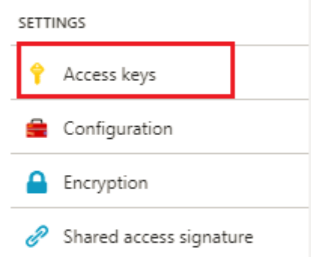
- Once the storage account is provisioned, navigate to it and click on Access Keys

Copy the respective Connection String as highlighted from the below image and save for future use.

Task 2: Download Project and replace storage account key
- Download the Employee information application using this link: https://trainingmaterial.blob.core.windows.net/azurefundamental/StorageDemo.zip
- Unzip the project file and open it in respective editor (recommended editor is Eclipse or any other editor of your choice). Open DBUtil.java file which is inside StorageDemo-> src-> com -> myproject -> util folder
- Add your Storage account key which you copied in previous steps in the storageConnectionString variable. Save the file once done
- After updating Storage account key, build and run your project and create .war file
Task 3: Clean, build and run the project
- Once the .war file is created, run the following docker build command to create an image docker
docker build -t empapp- Once the image is created, run using the docker run command to create an instance of the image
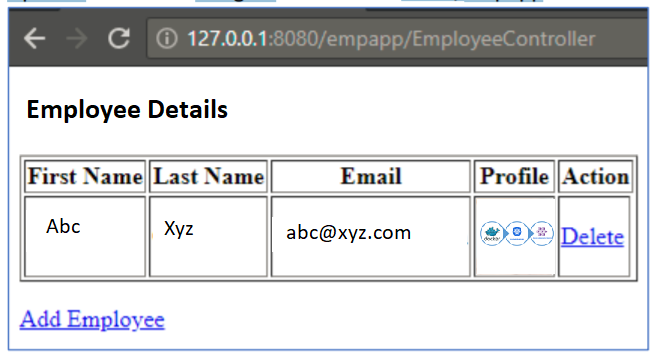
docker run -d -p 8080:8080 empapp- Open browser and navigate to 127.0.0.1:8080/empapp

That’s it, you are done with running and testing your application with local environment. To proceed further need to create Azure Container Registry (ACR). To deploy application push docker image from ACR to AKS.
So at the end, we have created local environment to run docker environment and created image to publish it for further usage.
Stay tune for next step i.e. – Provisioning and deploying ACR to secure docker image, deploy AKS cluster to host image – Part 2.

